Seven ways to get sharper snowflakes from your projector
A snowflake projector that looked crisp in the listing photos can throw soft, faint blobs onto your house. Most of the time the projector is fine and the setup is the problem. These seven fixes cost nothing, and the first one matters most.
Why the snowflakes go soft
Almost every budget snowflake projector is an LED behind a patterned film and a small lens, with a motor turning the pattern. The lens is usually fixed, so there is no focus ring and no way to sharpen the image except by moving the projector.
Light also follows the inverse-square law. Double the distance and the light from the lens has to cover four times the area, so each snowflake grows bigger and dimmer at once.
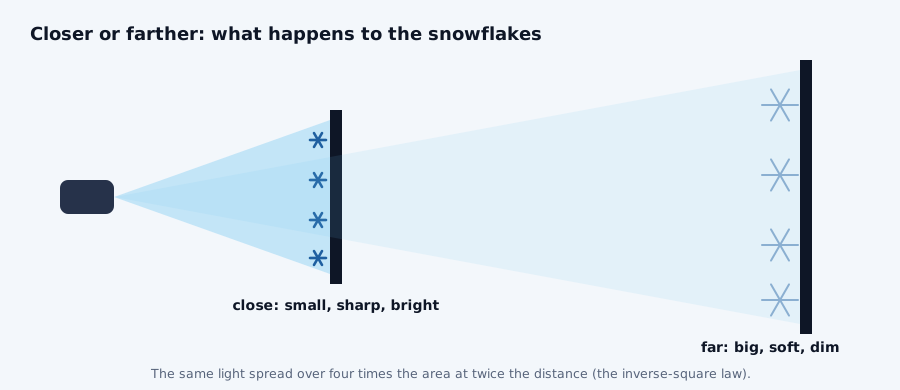
So the trade is built in. Close to the wall you get small, sharp, bright flakes, and far away you get big, soft, faint ones, and every fix below works with that rule rather than against it.
1. Move it closer
The fastest fix is to carry the projector a few steps toward the house. If the flakes sharpen and brighten, distance was the problem, and you can trade a little coverage for a cleaner picture.
Treat the listing’s range as your outer limit. LYHOPE quotes 16.4 to 33 ft, Forlivese a slightly longer 16 to 36 ft, and GUSODOR settles on about 33 ft.
The Govee H7071 is the outlier at about 10 ft. Our projection distance guide charts the figure for all six projectors.
2. Wait for full darkness
Snowflake projectors are faint next to a porch light, and sellers rarely publish lumens. At dusk the pattern looks washed out, and an hour later the same projector can look far crisper.
Street lights and porch lights do the same damage all night. Switch off your own outdoor lights on that side, and if a street light hits the wall, try the other side of the house.
Judge the picture on the first evening before you move anything. Look at dusk, again an hour later and once more at full dark, and you will see how much of the blur was daylight.
3. Pick a light, flat wall
The surface matters as much as the projector. White or pale siding, a garage door or stucco sends the pattern back cleanly, while dark brick swallows most of the light and so do trees and windows.
Owners of the Govee H7071 say the same, with colors looking their finest on a light, solid wall. Aim at the plainest stretch of the house rather than across windows and shutters.
4. Lower the angle
A projector sits low and points up, and the steeper it points, the more the flakes at the top stretch into ovals. Moving it back flattens the angle and moving it closer steepens it, so look for the middle ground.
Lifting the projector helps too. A wall bracket, a garden table or a base on a low step gives a flatter beam than a stake at grass level, and our setup and mounting guide walks through the options.
5. Clear fog and dirt off the lens
Moisture can bead up behind the glass as the projector cools once its run ends, and a damp night wets the outside as well. A fogged lens throws a hazy pattern even at the right distance.
Wipe the outer glass with a soft, dry cloth before the evening run. If fog sits inside the lens night after night, moisture is getting in, and the troubleshooting guide covers what to do next.
6. Know what the lens can do
The Govee H7071 is the one projector in our lineup with a focusing lens and swappable pattern discs. Owners call it bright up close, yet say its figures blur as it moves farther from the house, which fits Govee’s 10 ft advice.
Govee also warns that its water-ripple lens causes some color dispersion, so a little fringing is part of the look. Our Govee H7071 review covers the discs, and the glossary explains focus on fixed and adjustable lenses.
7. Match the projector to the wall
More heads do not make sharper flakes. A double-head or triple-head throws more patterns at once, so you can fill a wide wall from closer in instead of pushing one head farther back.
That is the case for the Forlivese, rated at 235 to 521 sq ft from three heads. One, two or three heads weighs it against the double-heads, and the budget projector guide looks at the cheapest models.
Two projectors on one long wall are another answer, each set closer and covering half. Let the patterns overlap a little at the middle so no dark gap opens between them.
Never chase a brighter picture by tilting the projector toward the sky or the street. Keep every beam on your own wall, clear of drivers and aircraft, and out of your neighbors’ windows.
A five-minute check before you give up
- Wait until it is fully dark and switch off nearby outdoor lights
- Wipe the lens and look for fog inside it
- Move the projector to the near end of its listed range
- Aim at the lightest, flattest wall you have
- Raise it or step it back if the top flakes stretch
If the image is still a smear after all five, the unit may be faulty, so use the return window on the listing. Our snowflake projector comparison and its side-by-side table show the alternatives.
The tips on the homepage collect more of what the box leaves out. Read them before the first evening and you skip most of the guesswork.
For crisp flakes from the lawn
The GUSODOR SW-TY-002 gives its sweet spot as roughly 33 ft out and spreads its pattern from two heads that each turn 360°. Owners describe the flakes as crisp and bright on the house, and like every fixed-lens projector it sharpens as you move it closer.
