Where to put a snowflake projector, and how to mount it
Setup takes ten minutes once you know where the projector goes. The spot decides how sharp the snowflakes look and how dry the plug stays, and the mount decides whether it still points at the house after the first storm.
Start with the wall
Pick the wall before the spot. A light, flat, solid surface such as white siding, a garage door or stucco shows the pattern well, while dark brick and trees soak it up and windows let it fall through.
Look at the wall after dark too. One in the glow of a street light or porch light will wash out the snowflakes, so the side of the house you see from the road is not always the right one.
Find the spot
Most double-heads want to sit roughly 16 to 33 ft from the wall, low in the lawn and pointing up. The figure shows the usual layout, with the adapter in a covered box near a GFCI outlet.
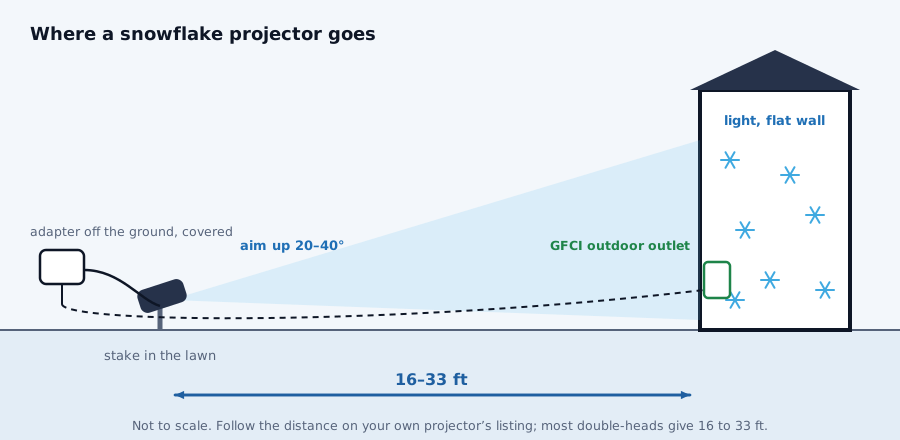
Your own listing has the final word. Govee asks for only about 10 ft, the Forlivese for 16 to 36 ft and the GUSODOR for about 33, and our projection distance guide lines up all six.
Measure the cord before you settle on a spot. The GUSODOR has a 16.4 ft power cord and the Forlivese and LYHOPE 9.8 ft, so the outlet may decide the spot more than the wall does.
Stake, base or wall
Most of these projectors ship with more than one mount. Choose by the ground under you and how long the projector has to stay put.
- GUSODOR SW-TY-002
- Ground stake, round base or wall bracket with 3 screws
- LILNIAGY HT-TY-10
- Wall, ground stake or lawn
- Forlivese triple-head
- Table base, ground stake or wall
- Govee H7071
- Ground stake and mounting plate; the head tilts through 180°
- LYHOPE double-head
- Ground stake, base or wall screws, 360° rotation
- Brightown tree topper
- Sits on top of an indoor Christmas tree
The ground stake
A ground stake is the default for a lawn. Push it in straight and deep enough that the head will not lean once wet soil softens, then turn each head by hand to aim.
Frozen ground is the common snag. Make a pilot hole first with a screwdriver or a long nail, rather than pressing or hammering on the projector itself.
The base
A round base suits a patio, a step or a garden table, and it lifts the projector above shallow snow. It also flattens the beam a little, which stops the flakes at the top of the wall from stretching.
On a windy yard, tuck the base against something solid. These projectors weigh around 1 lb, apart from the 5.1 lb Govee, so a gust or a passing dog can knock one off its aim.
The wall bracket
A bracket under the eaves or on a fence post keeps the projector out of the snow and away from feet and paws. Screw it into wood rather than thin siding, and check the beam lands on the wall rather than the street.
Power, cord and adapter
Plug into a GFCI-protected outdoor outlet, which the National Electrical Code requires on the outside of homes. If the cord falls short, add an extension made for outdoor use, whose jacket code includes a W (SJTW, for example).
The adapter is often the weak point. The GUSODOR and LILNIAGY pair an IP65 head with an IP44 plug or adapter, and LYHOPE says its adapter is not waterproof, so it belongs inside a covered connection box or a bubble-style outlet cover.
- Keep every plug-and-cord connection off the ground and out of puddles
- Keep the cord out of door and window gaps, where closing them crushes it
- Don’t staple through a cord to hold it in place
- Route the cord where nobody will trip over it in the dark
Our projector safety guide covers the wiring in more detail. The ratings on head and plug are explained in what IP44, IP65 and IP67 mean.
Aim it after dark
Switch on once it is dark and turn each head by hand until the pattern fills the stretch of wall you want. On a double-head, set the two patterns side by side for width or overlap them for density.
Keep every beam on your own house. Never point it at the sky or the street, keep it out of a neighbor’s windows, and check from the sidewalk that nothing spills where it should not.
If the flakes look soft, try a step closer before anything else. Seven ways to get sharper snowflakes goes through the other fixes.
Snow, cold and the rest of winter
A projector on a short stake can vanish under a heavy snowfall. Brush it clear after each storm, or raise it on a base or bracket from the start if your winters bring deep snow.
Cold has limits too. The Forlivese is rated to work between 5 °F and 95 °F (−15 °C and 35 °C), so on the coldest northern nights it runs outside its own rating.
A projector that cools down after its evening run can mist up behind the lens. A spot under the eaves, out of direct snow and rain, cuts down how wet it gets in the first place.
The plug-and-play LILNIAGY HT-TY-10 has no remote or timer, so it runs whenever the outlet is live. Put it on an outdoor-rated plug-in timer at setup, and see our LILNIAGY review for its mounts and ratings.
A setup checklist
- Pick a light, flat wall away from street and porch lights
- Measure from the outlet so the cord reaches without strain
- Set the projector at its listed distance, low and aimed up
- Put the adapter in a covered outdoor box, raised off the lawn
- Aim each head after dark and check nothing reaches the street
- Start the timer at dusk
Still deciding? Our guide to which snowflake projector to buy compares all six on the homepage. The projector cards and the setup tips there fill in the details.
A projector with every mount in the box
The GUSODOR SW-TY-002 ships with three mounts in the box (a stake, a base and a screw-on wall bracket), and at 16.4 ft its cord is the longest of the six. Its IP65 head is matched with an IP44 plug, so give the plug a covered box.
